Wednesday 27 February 2013

Vmware Player & ESXi


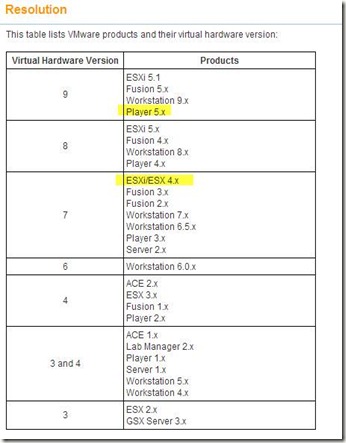
When you wish to upload a Vmware Player virtual machine to ESXi take note of the Virtual Hardware version. The link below gives you the table:

http://kb.vmware.com/selfservice/microsites/search.do?language=en_US&cmd=displayKC&externalId=1003746

Vmware Player 5.x uses Virtual Hardware Version 9 which is not compatible with ESX 4.x (as shown below). To convert back to Virtual Hardware Version 7, use Vmware Converter Standalone.

clip_image002

Vmware Converter Standalone

image

Friday 22 February 2013

How to Seed & Purge the OBIEE query cache


The OBIEE query cache can be programmatically purged then seeded at the end of each ETL.

· The utility nqcmd can be used for this purpose and can be wrapped in a shell script and scheduled at the end of the daily ETL

· A list of logical SQL statements should be passed to the utility

· The logical SQL statements to seed can be extracted from Usage Tracking

· Note: the development environment has the query cache OFF by default to help with physical SQL debugging

See Query Caching section of System Administration guide:

http://docs.oracle.com/cd/E21764_01/bi.1111/e10541/querycaching.htm

See Section 7.6.2 Purging and Maintaining Cache Using ODBC Procedures.

The query cache can be completely purged, then seeded at the end of the ETL through the used of the nqcmd utility.

Example

Create script which first purges OBI cache, then seeds it with query results (example below is run on Sample Application npe-obi-app01:7002)

Sample Script:

Call SAPurgeAllCache();

SELECT

0 s_0,

"A - Sample Sales"."Time"."T05 Per Name Year" s_1,

"A - Sample Sales"."Base Facts"."1- Revenue" s_2

FROM "A - Sample Sales"

ORDER BY 1, 2 ASC NULLS LAST;

Run Command:

D:\obi_sample\Oracle_BI1\bifoundation\server\bin>nqcmd -d coreapplication_OH1901

154131 -u weblogic -p Admin123 -s HNZSeedCache.txt

-------------------------------------------------------------------------------

Oracle BI ODBC Client

Copyright (c) 1997-2011 Oracle Corporation, All rights reserved

-------------------------------------------------------------------------------

Call SAPurgeAllCache()

Call SAPurgeAllCache()

--------------------------------------------------------------------------------

--------------------------------------------------------------------------------

--------------------------------------------------------------------------------

------------------------------

RESULT_CODE RESULT_MESSAGE

--------------------------------------------------------------------------------

--------------------------------------------------------------------------------

--------------------------------------------------------------------------------

------------------------------

1 [59118] Operation SAPurgeAllCache succeeded!

--------------------------------------------------------------------------------

--------------------------------------------------------------------------------

--------------------------------------------------------------------------------

------------------------------

Row count: 1

--------------------------------------------------------------------------------

--------------------------------------------------------------------------------

--------------------------------------------------------------------------------

------------------------------

SELECT

0 s_0,

"A - Sample Sales"."Time"."T05 Per Name Year" s_1,

"A - Sample Sales"."Base Facts"."1- Revenue" s_2

FROM "A - Sample Sales"

ORDER BY 1, 2 ASC NULLS LAST

SELECT

0 s_0,

"A - Sample Sales"."Time"."T05 Per Name Year" s_1,

"A - Sample Sales"."Base Facts"."1- Revenue" s_2

FROM "A - Sample Sales"

ORDER BY 1, 2 ASC NULLS LAST

-----------------------------------------

s_0 s_1 s_2

-----------------------------------------

0 2008 16500000.00

0 2009 15000000.00

0 2010 18500000.00

-----------------------------------------

Row count: 3

-----------------------------------------

Processed: 2 queries

D:\obi_sample\Oracle_BI1\bifoundation\server\bin>
How to model the OBIEE RPD (Basic)


OBIEE: Modelling an existing EDW Subject Area (Bottom-Up) based upon existing reports.

The following steps summarise the modelling steps. This PDF has diagrams to illustrate the steps.


1. Before you start:

1.1. Talk to user and understand business behind report

1.2. Talk to business analyst and get example report, SQLs, existing ER diagrams

1.3. Understand grain, dimensionality of subject area

1.4. Check SQLs, data quality and join conditions via SQL*Developer

1.5. Ensure you are working in the correct OBIEE environment

clip_image002[12] OBIS works with facts at a logical level – understanding fact granularity is key

This approach assumes physical tables have been built, and populated and are accessible to OBIS.

image

Key Terms & Concepts

Oracle BI Server (OBIS) the heart of OBIEE

RPD – Repository file where modelling takes place

Physical layer – Where physical source objects are defined

Logical layer or Business Model & Mapping layer – Where logical hierarchies, joins, and aggregation rules are set

Presentation Layer - the layer that is exposed to query clients such as Oracle BI Presentation Services (OBIPS)

LTS – Logical Table Source: a logical table contains one or more LTSes


2. Physical Layer:

2.1. Import Metadata

2.2. Re-use, create, and/or duplicate physical layer Aliases

2.3. Set Physical Joins between Aliases with Physical Diagram tool – physical keys will automatically created

clip_image002[13] Always work with physical Aliases

Physical aliases allow a single underlying table to be used for a variety of roles

Joins and keys are set on Alias, not on underlying table

Column defs are done on underlying table, and are reflected in Alias

Physical Diagrams:

Star Schemas and Transactional (Snowflaked) schemas can be modelled.

image

Database, Connection Pools, etc.

image

3. Logical Layer:

3.1. New logical tables: Drag & drop physical aliases to ABC ORG. Core subject area

3.1.1. Rename cols using Rename Wizard according to standard

3.2. Existing logical tables: Drag & drop physical aliases to existing logical table within ABC ORG. Core

3.2.1. Rename cols, remove unwanted cols

3.3. Set description for each logical column, these are available to users in Analysis Editor as tooltips image

3.4. Set logical table properties (General->Description, Keys)

3.5. Diagram logical joins with Business Model Diagram, set join cardinality and type (inner, left outer, etc.)

3.6. Set aggregate rules for logical columns which are facts. These should turn yellow denoting logical measure clip_image006[4]

3.7. Set LTS properties (General, Column Mapping)

3.8. Create logical dimensions (hierarchies) and define properties, levels, level keys, etc. as necessary

3.9. Set Content tab for logical tables sources (Aggregation content, Where Clause, Fragmentation content). Add joins to LTS as necessary.

3.10. Create derived logical columns and level-based measures as necessary

3.11. Check subject area consistency (not global consistency)

clip_image002[14] Always set the LTS Content tab. This is used by OBIS to choose the most economic source.

The Business Model Diagram should be a Logical Star for each Subject Area

Snapshotted measures are aggregated with a LAST function on the Snapshot Period dimension as the data is already aggregated by period in the tables. The LAST function takes will take the last available period when the period is not in the query.

Check consistency often.

Always have a logical star. Ensure LTS Content Tab is set. Define logical dimensions (hierarchies).

image

4. Presentation Layer:

4.1. Either create or re-use existing Subject Area (eg. Assets – Property Snapshot)

4.2. Set Subject Area description, implicit fact column

4.3. Add presentation tables to subject area by either dragging & dropping from logical layer or copy & pasting from other subject areas

4.4. Rename presentation tables in accordance with standards (remove dim – prefix for dimensions). Remove unwanted presentation columns.

4.5. Order presentation tables Snapshot Period first table, then assets/advisor hierarchy, then alphabetical dimensions, then facts.

4.6. Nest tables as necessary with -> in Description

4.7. Set object permissions on subject areas, presentation tables, and presentation columns to restrict access as necessary

clip_image002[15] Make subject areas as simple as possible mapping to a single logical star

Strictly follow naming conventions

Remove hierarchical columns where no hierarchy exists

image

5. Sanity test subject area:

5.1. Create a new analysis and examine generated physical SQL, data quality, and response times.

5.2. Test granularity of facts by creating query with an attribute from each dimension

5.3. Test aggregation rules of measures

5.4. Test drill-down of hierarchical columns and attributes with drill

clip_image002[16]When creating Analyses always start with simple requests and progressively add attributes

Refresh Metadata often from Analysis Editor to get latest RPD online-mode changes

Test bad generated physical SQL in SQL*Developer and compare to original SQLs provided by analyst

image

Help:

The Admin Tool help functionality is comprehensive. There is also online documentation from the Oracle Web Site. Finally, there are some well known bloggers. The BI Applications RPD provides an excellent reference for OBIEE best practise. The OBIEE Sample Application is a great reference point. Develop a set of OBIEE dimensional modelling standards & conventions.

Wednesday 20 February 2013

How to Convert VirtualBox / OVA to Vmware


These are the steps I followed to convert a VirtualBox OVA archive to Vmware using Vmware Player.

Tested on Windows 7 x64clip_image001

Step


Install Vmware Player


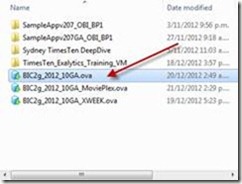
Vmware Player->File->Open


clip_image003

Choose image


clip_image005

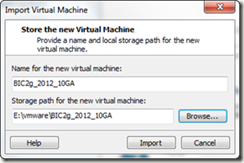
Choose path to store virtual machine


clip_image007

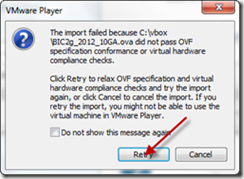
Click Retry on warning message


clip_image009

Wait for Import to complete (up to 1 hr)


clip_image011

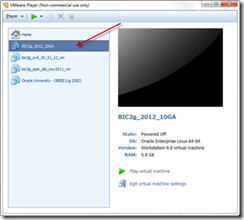
Vmware Player shows imported machine


clip_image013

Check Virtual Machine Settings:

Voila


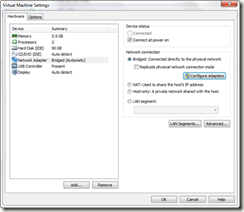
clip_image015

Setting up Google Maps API

Obtain a Google Maps API key as per instructions:

https://developers.google.com/maps/documentation/javascript/tutorial#api_key

image

Copy API Key

image

Paste to Map Viewer, Google Maps, Map Tile Layer

image

Alternatively, simply clear this field, and use no API key.

Tuesday 19 February 2013

OBIEE Charts Blur in Chrome


OBIEE 11g (11.1.1.6.2 BP1) charts blur in Chrome (Version 24.0.1312.57 m).

image

This is caused by the Flash Plugin. Version info found with chrome:plugins

Two versions are available, I disabled the first.

image

And refresh dashboard page, result is good:

image

Links -

https://forums.oracle.com/forums/thread.jspa?threadID=2456673

ODBC Problem: Excel & OBIEE 11g on Windows


I want to use an Excel worksheet as a source on my Windows 7 x64 laptop. I have OBIEE 11g (11.1.1.6.2 BP1) installed and MS Office 2010 32-bit.

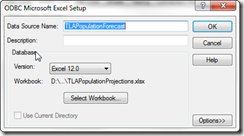
So I first setup the ODBC source, using the 32-bit version of the ODBC Administrator tool, since I have MS Office 2010 32-bit installed. From: http://support.microsoft.com/kb/942976

A 64-bit version of the Microsoft Windows operating system includes the following versions of the Microsoft Open Database Connectivity (ODBC) Data Source Administrator tool (Odbcad32.exe):

  • The 32-bit version of the Odbcad32.exe file is located in the %systemdrive%\Windows\SysWoW64 folder.
  • The 64-bit version of the Odbcad32.exe file is located in the %systemdrive%\Windows\System32 folder.

(Confusing…)

SNAGHTML1ce12a

Done.

Through the OBIEE 11g Admin Tool (11.1.1.6.2 BP 1), I can import ODBC Excel metadata.

image

After deploying it through Enterprise Manager however, OBIEE 11g BI Server does not like the 32-bit Excel ODBC driver, as the Answers request below shows. (This driver comes bundled with MS Office 2010 32-Bit)

image

[Microsoft][ODBC Driver Manager] The specified DSN contains an architecture mismatch between the Driver and Application. (HY000

So the solution is to install the 64-bit Microsoft Access components?

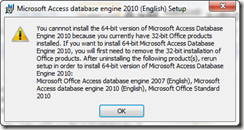
Unfortunately not …

SNAGHTML1866ae

What is the solution?

Perhaps this ?

Use the /passive parameter to force install of the 64-bit ODBC drivers:

AccessDatabaseEngine_2010_x64.exe /passive

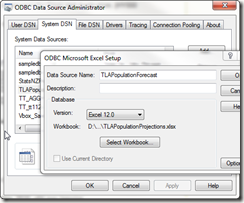
Add ODBC source to 64-Bit ODBC with same DSN name:

%systemdrive%\Windows\System32\odbcad32.exe

SNAGHTML36d00b

Refresh request page:

image

Voila. Hardly elegant, but at first glance this works…

Useful Links -

http://social.msdn.microsoft.com/Forums/en-US/adodotnetdataproviders/thread/abf34eea-1029-429a-b88e-4671bffcee76/#b6deab32-c1e0-436d-b783-8a4948ff99ec

http://spotfirecommunity.tibco.com/community/Themes/leanandgreen/Forums/viewIphoneThread.aspx?PostID=4863

First glance, was not enough … next time you open Excel:

image

Warning: This occurs every time you open Excel, Word, and breaks my Xobni add-in to Outlook! This approach effectively breaks your existing Office 32-bit install.


Fortunately, at first glance, my Answers request still works -

image

The following link details installing ODBC drivers for Linux:

http://stackoverflow.com/questions/401358/how-do-i-create-a-dsn-for-odbc-in-linux

http://stackoverflow.com/questions/7116019/hand-install-of-64-bit-ms-access-odbc-drivers-when-32-bit-office-is-present